How to Connect TradingView Alerts to Tradovate with AlgoWay Webhook Automation
AlgoWay lets you connect TradingView alerts to Tradovate through webhook automation. You create a Tradovate webhook in AlgoWay, authorize your Tradovate session, select the correct account, test execution from the AlgoWay dashboard, and then paste the AlgoWay webhook URL into TradingView.
This guide is written for traders searching for how to connect TradingView to Tradovate, TradingView to Tradovate webhook, Tradovate automated trading, Tradovate trading bot webhook, TradingView futures automation, and automated futures trading with TradingView alerts.
The practical route is:
TradingView alert → AlgoWay webhook → Tradovate authorization session → Tradovate futures account
TradingView creates the signal. AlgoWay receives and validates the webhook JSON. Tradovate receives the futures execution request through the authorized session and account settings configured in AlgoWay.
Last updated: 2026-05-12 • Author: AlgoWay
Quick Answer: TradingView to Tradovate with AlgoWay
To automate Tradovate from TradingView, you need four things:
- a Tradovate account with valid login access;
- an AlgoWay Tradovate webhook;
- a successful Tradovate authorization session inside AlgoWay;
- a valid TradingView alert JSON message sent to the AlgoWay webhook URL.
After authorization succeeds, one TradingView alert can send a futures trading command to AlgoWay, and AlgoWay can route it to Tradovate.
Why Traders Use Webhooks for TradingView to Tradovate Automation
TradingView is often used for charting, Pine Script strategies, alerts and market logic. Tradovate is widely used for futures trading. The missing layer is automated execution: how does a TradingView alert become a Tradovate order without a custom server?
AlgoWay provides this bridge. Instead of building and hosting your own TradingView-to-Tradovate bot, you create a webhook route in the AlgoWay dashboard and use structured JSON in the TradingView alert message.
This is useful for:
- automating TradingView futures strategy alerts;
- routing alerts to Tradovate demo or live accounts;
- testing MNQ, MES, NQ, ES and other futures workflows;
- avoiding a custom webhook server;
- using AlgoWay logs to debug the exact payload and response;
- keeping TradingView as the signal source and Tradovate as the execution destination.
Before You Start
Prepare the following before creating the Tradovate webhook:
- an active AlgoWay account;
- a Tradovate demo or live account;
- your Tradovate username or email;
- your Tradovate password;
- your Tradovate Account ID if you want to target a specific account;
- a TradingView strategy, indicator or manual alert;
- a valid JSON alert message for AlgoWay.
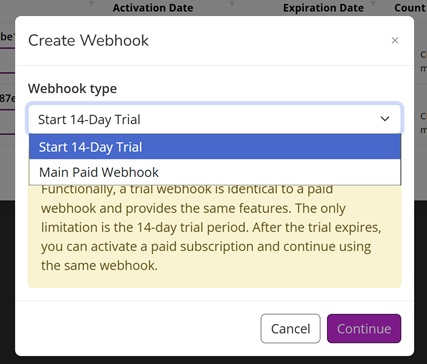
Step 1. Create a Tradovate Webhook in AlgoWay
Log in to your AlgoWay dashboard and create a new webhook for Tradovate.
- Open your AlgoWay Dashboard.
- Click Create Webhook or Add Webhook.
- Select one of the available webhook types:
- Start 14-Day Trial
- Main Paid Webhook
- Click Continue.
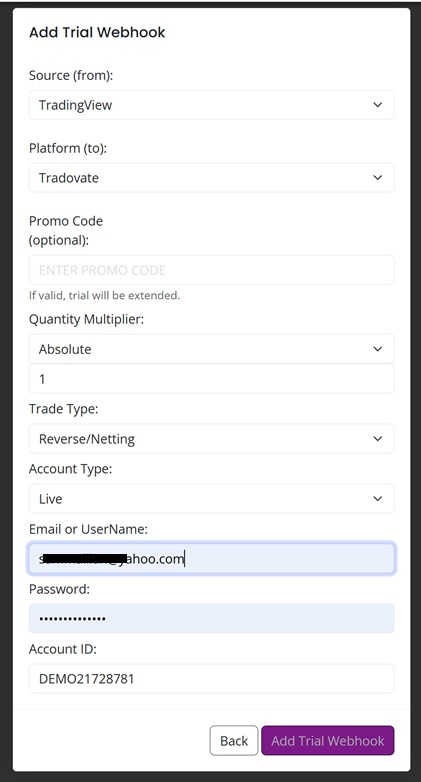
Step 2. Enter Tradovate Login and Account Settings
In the webhook form, select Tradovate as the destination platform and enter your Tradovate login details.
Main fields:
| Field | Recommended value | Purpose |
|---|---|---|
| Source | TradingView | The alert source that sends the signal. |
| Platform | Tradovate | The execution destination. |
| Quantity Multiplier | Absolute | Controls how incoming quantity is interpreted. |
| Trade Type | Reverse / Netting | Defines position behavior for futures-style execution. |
| Account Type | Demo or Live | Must match the Tradovate environment you want to trade. |
| Email or UserName | Your Tradovate login | Used for session authorization. |
| Password | Your Tradovate password | Used for session authorization. |
| Account ID | Your Tradovate account number | Routes orders to a specific account if you have more than one. |
You can find your Tradovate Account ID inside the Tradovate platform, usually in the account selector or account list. Demo account numbers often start with DEMO.
If Account ID is empty, AlgoWay can request available accounts and use the first account returned by Tradovate. If you have more than one account, enter the exact Account ID manually.
Step 3. Wait for Tradovate Authorization
After clicking Add Trial Webhook or creating your paid webhook, wait until AlgoWay completes Tradovate authorization. This may take around 20–30 seconds.
AlgoWay connects to Tradovate, authorizes the session and prepares the webhook for futures execution. If authorization succeeds, you should see dashboard messages such as:
Tradovate authorization successful — session is ready.
Webhook added successfully
Only after these messages appear is the Tradovate webhook ready for test execution.
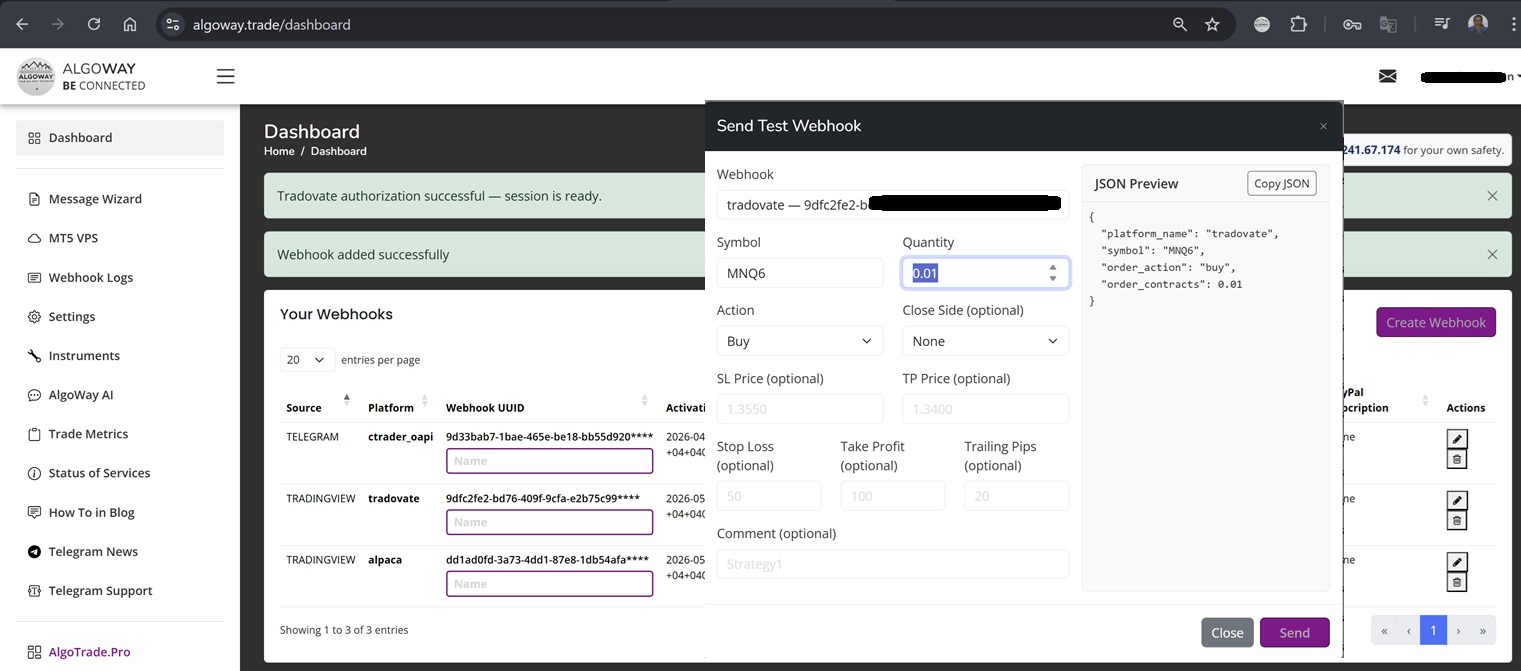
Step 4. Send a Test Webhook from AlgoWay
Before using TradingView, send a test webhook directly from AlgoWay. This confirms that the Tradovate session, account, symbol and order parameters are usable.
- Open Webhook Logs in AlgoWay.
- Click Test Webhook.
- Select your Tradovate webhook.
- Enter a Tradovate futures symbol.
- Set quantity and action.
- Click Send.
Example test JSON:
{
  "platform_name": "tradovate",
  "ticker": "MNQ6",
  "order_action": "buy",
  "order_contracts": 1
}
If the test fails, check Account Type, Account ID, session authorization, futures symbol, order quantity, account permissions and AlgoWay logs before moving to TradingView.
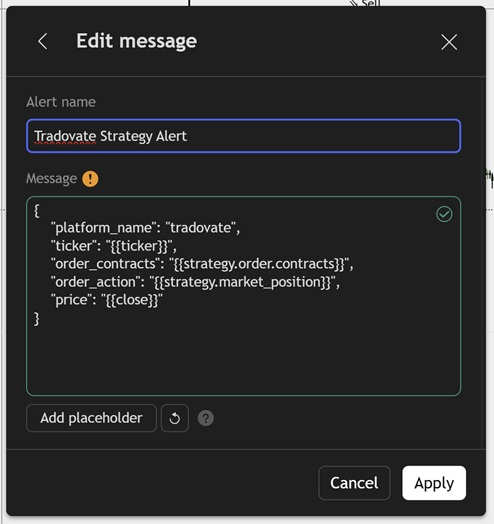
Step 5. Create a TradingView Strategy Alert for Tradovate
If you use a TradingView Strategy, paste structured JSON into the TradingView alert message. TradingView placeholders will be replaced with real values when the alert fires.
{
  "platform_name": "tradovate",
  "ticker": "{{ticker}}",
  "order_contracts": "{{strategy.order.contracts}}",
  "order_action": "{{strategy.market_position}}",
  "price": "{{close}}"
}
Common TradingView placeholders:
{{ticker}}— the chart ticker;{{strategy.order.contracts}}— strategy order size;{{strategy.market_position}}— current strategy position;{{close}}— close price at alert time.
Step 6. Indicator Alerts and Manual Alerts
TradingView Strategy alerts are not the only option. AlgoWay can also work with indicator alerts and manual alerts if the final message is valid AlgoWay JSON.
For indicator-based alerts, use tools inside the AlgoWay dashboard:
- Message Wizard — helps build a valid AlgoWay webhook message manually.
- AlgoWay AI — helps convert a text signal into structured AlgoWay JSON.
This is useful when your indicator sends custom text instead of strategy placeholders such as {{strategy.order.contracts}}.
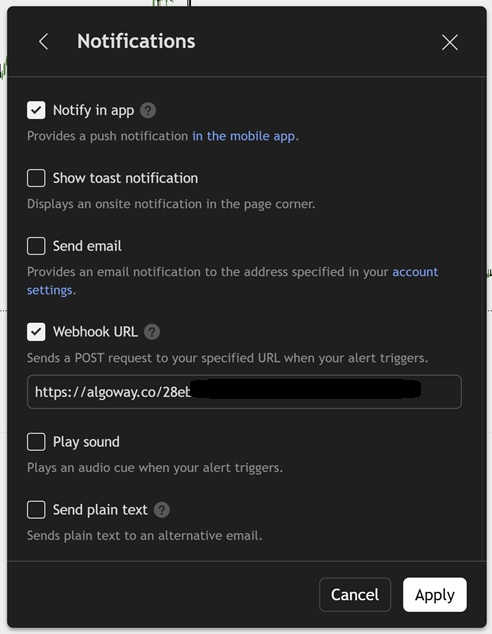
Step 7. Add the AlgoWay Webhook URL in TradingView
In the TradingView alert settings, open the Notifications tab, enable Webhook URL, and paste your AlgoWay webhook URL.
Your webhook URL uses the unique UUID from your AlgoWay webhook:
https://algoway.co/your-webhook-uuid
Then click Apply or Create to save the alert.
Required JSON Fields for Tradovate Webhook Automation
A basic Tradovate webhook message usually needs these fields:
| Field | Example | Purpose |
|---|---|---|
platform_name | tradovate | Tells AlgoWay to route the command to Tradovate. |
ticker | MNQ6 | Defines the futures symbol. |
order_action | buy | Defines the trading action. |
order_contracts | 1 | Defines the number of contracts or configured quantity value. |
Use ticker consistently. If your older test message used symbol, standardize the message according to the current AlgoWay JSON guide before live trading.
Tradovate Futures Symbol Notes
Futures symbols are not the same as stock or crypto tickers. Tradovate symbols may include contract-specific naming and may differ from what you see in TradingView.
Before using live automation:
- confirm the exact Tradovate futures symbol;
- check whether the contract is active;
- check whether the account has permission to trade the product;
- confirm session hours;
- test one small order before using strategy size.
If a TradingView ticker does not match Tradovate's expected symbol, use the AlgoWay configuration and message design to avoid symbol mismatch.
Common Tradovate Webhook Problems
Tradovate Authorization Failed
Check username, password, account type, network availability and whether Tradovate requires additional authorization steps. Recreate or reauthorize the webhook if needed.
Wrong Account ID
If you have multiple Tradovate accounts, enter the exact Account ID. Otherwise the first returned account may not be the one you intended to trade.
Demo vs Live Mismatch
Make sure Account Type matches the Tradovate credentials and account you want to use. A demo account and a live account are not interchangeable.
Invalid Futures Symbol
Check that the symbol exists, is active and is tradable in the selected account.
Invalid Quantity
Futures contracts are usually traded in whole contract quantities. Test with a valid quantity accepted by Tradovate.
TradingView JSON Is Invalid
TradingView must send valid JSON. Broken commas, missing quotes, plain text alerts or unsupported fields can stop the webhook before Tradovate execution.
Webhook URL Missing in TradingView
The TradingView alert must have the AlgoWay webhook URL enabled in the Notifications tab. The JSON message alone is not enough.
Why Use AlgoWay Instead of Building a TradingView to Tradovate Bot?
You can build your own TradingView-to-Tradovate automation stack. That requires a public webhook endpoint, server hosting, JSON parser, Tradovate authorization handling, account routing, order mapping, logging, error handling and ongoing maintenance.
AlgoWay is built for traders who want the automation route without maintaining that infrastructure. The dashboard creates the webhook, stores the integration settings, handles authorization, receives TradingView alerts and routes the command to Tradovate.
This gives you:
- a no-code TradingView to Tradovate webhook bridge;
- dashboard-based authorization and test workflow;
- structured JSON alert handling;
- logs for received payloads and platform responses;
- support for indicator, strategy and manual alert workflows;
- one AlgoWay environment for multiple platforms.
Related AlgoWay Guides
- How to create a webhook in TradingView
- TradingView webhook alerts and automation basics
- AlgoWay JSON schema guide
- How to fix AlgoWay webhook Error 415
- How to copy TradingView alerts to multiple accounts
- How to connect TradingView to MetaTrader 5 with AlgoWay EA
- How to connect TradingView to Binance with AlgoWay
- How to connect TradingView to Bybit with AlgoWay
Final Summary
To automate Tradovate from TradingView, create a Tradovate webhook in AlgoWay, enter the correct Tradovate login and account settings, wait for successful authorization, test the webhook, and then connect TradingView using the AlgoWay webhook URL and a valid JSON alert message.
AlgoWay turns TradingView alerts into Tradovate webhook automation without forcing you to build your own futures trading bot infrastructure.