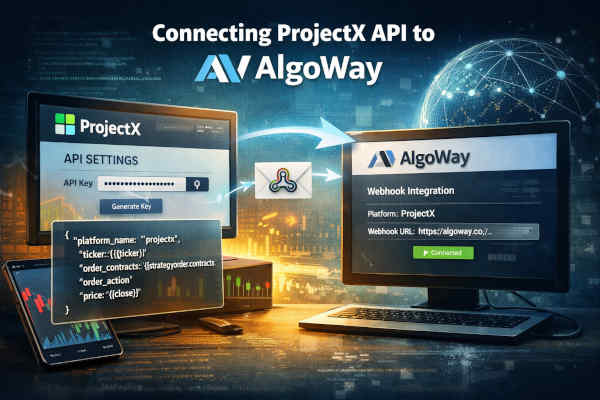
How to Connect TradingView Alerts to ProjectX with AlgoWay Webhook Automation
AlgoWay lets you connect TradingView alerts to ProjectX through webhook automation. You enable ProjectX API Access, create an API key in your ProjectX-connected trading platform, create a ProjectX webhook in AlgoWay, test the connection, and then paste the AlgoWay webhook URL and JSON message into TradingView.
This guide is written for traders searching for TradingView to ProjectX, ProjectX webhook automation, ProjectX API trading, ProjectX TradingView alerts, TopstepX API automation, prop firm futures automation, and TradingView futures trading bot.
The execution route is:
TradingView alert → AlgoWay webhook → ProjectX API → ProjectX-connected futures account
TradingView creates the signal. AlgoWay receives and validates the webhook JSON. ProjectX receives the final trading request through the API key and account settings configured in AlgoWay.
Last updated: 2026-05-12 • Author: AlgoWay
Quick Answer: TradingView to ProjectX with AlgoWay
To automate ProjectX from TradingView through AlgoWay:
- Enable ProjectX API Access in your ProjectX / connected platform flow.
- Create an API key in the ProjectX-connected trading platform.
- Create an AlgoWay webhook with Source = TradingView and Platform = ProjectX.
- Select the correct account type, broker/prop firm and trade mode.
- Paste your ProjectX account email and API key into AlgoWay.
- Send a test webhook from AlgoWay.
- Copy the AlgoWay webhook URL.
- Create a TradingView alert with valid ProjectX JSON and the AlgoWay webhook URL.
After setup, every matching TradingView alert can be routed to ProjectX through AlgoWay.
What Is ProjectX API Automation?
ProjectX API automation gives traders a way to automate trading, build custom tools, connect third-party software and manage futures trading workflows through the ProjectX gateway. AlgoWay uses that API layer as the execution destination for TradingView webhook alerts.
In practical terms, ProjectX is used heavily in futures and prop-firm workflows. A trader may run a TradingView strategy on ES, NQ, MES, MNQ or another futures symbol, then use AlgoWay to route the alert into a ProjectX-connected account.
AlgoWay does not replace ProjectX. AlgoWay is the webhook automation layer between TradingView and the ProjectX API.
| Layer | Role |
|---|---|
| TradingView | Creates the strategy, indicator or manual alert. |
| AlgoWay | Receives webhook JSON, validates it and routes the command. |
| ProjectX API | Receives the authenticated trading request. |
| ProjectX-connected account | Executes or rejects the order according to account and market rules. |
Before You Start
Prepare the following:
- AlgoWay account;
- ProjectX account or ProjectX-connected platform access;
- active ProjectX API Access subscription where required;
- ProjectX API key;
- correct ProjectX account email or username;
- correct Broker / Prop Firm selection in AlgoWay;
- TradingView strategy, indicator or manual alert;
- TradingView plan that supports webhook alerts;
- small test quantity for the first webhook test.
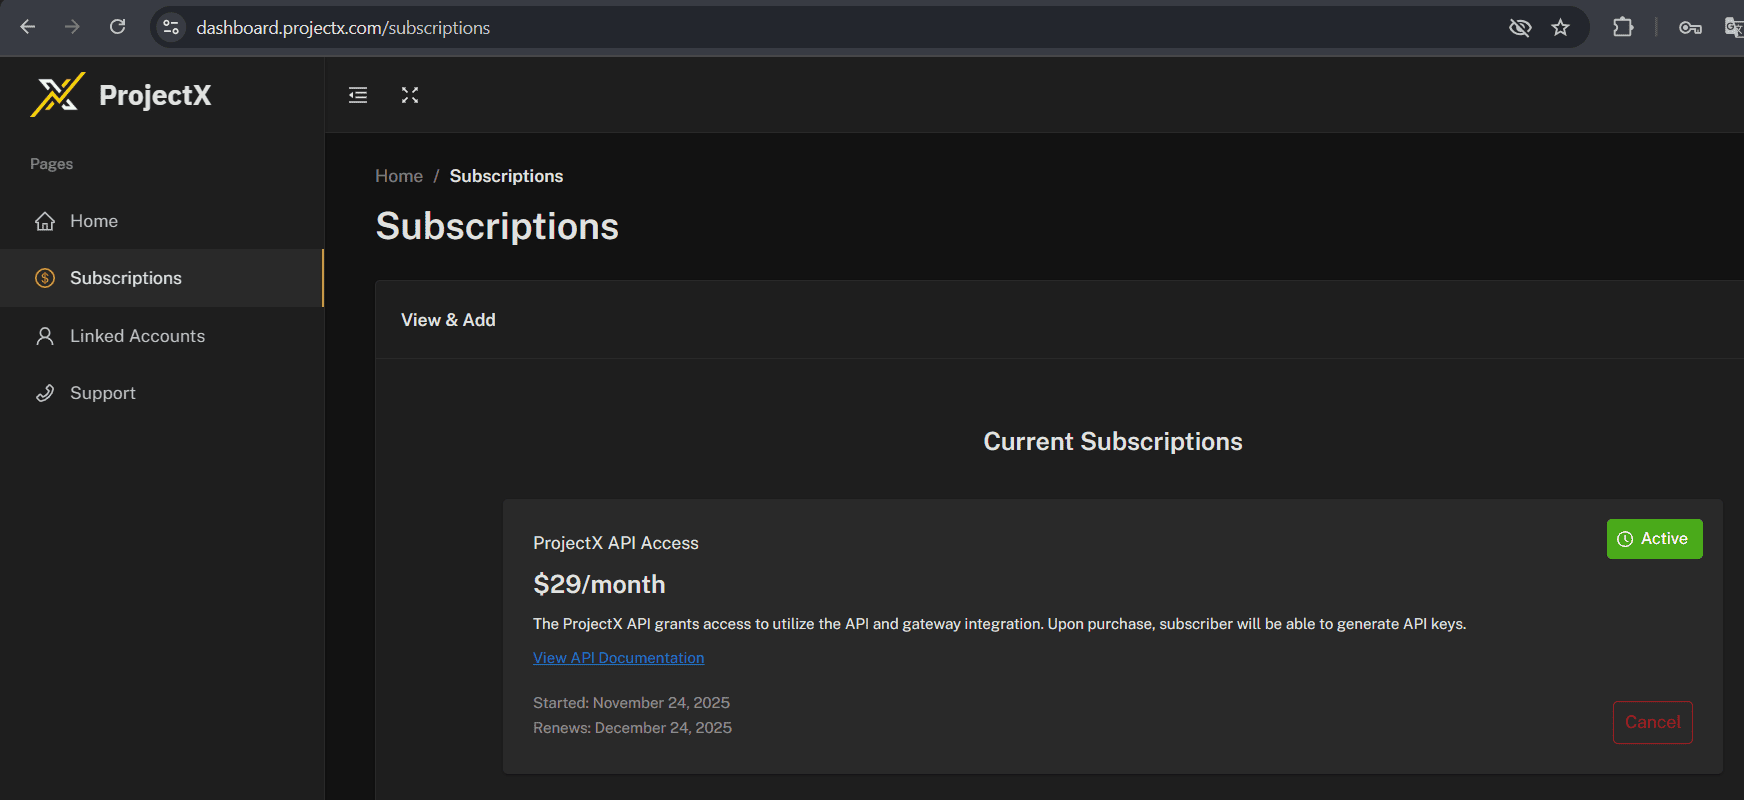
Step 1. Enable ProjectX API Access
Log in to your ProjectX client area or the connected platform flow and open the API / Subscriptions area. Enable or purchase ProjectX API Access if your account requires it.
- Open your ProjectX or connected platform dashboard.
- Go to Subscriptions or the API Access section.
- Select ProjectX API Access.
- Complete the subscription process.
- Confirm that the subscription status is Active.
Do not create the AlgoWay webhook until API access is active. If API access is inactive, AlgoWay can receive the TradingView alert but ProjectX execution may fail.
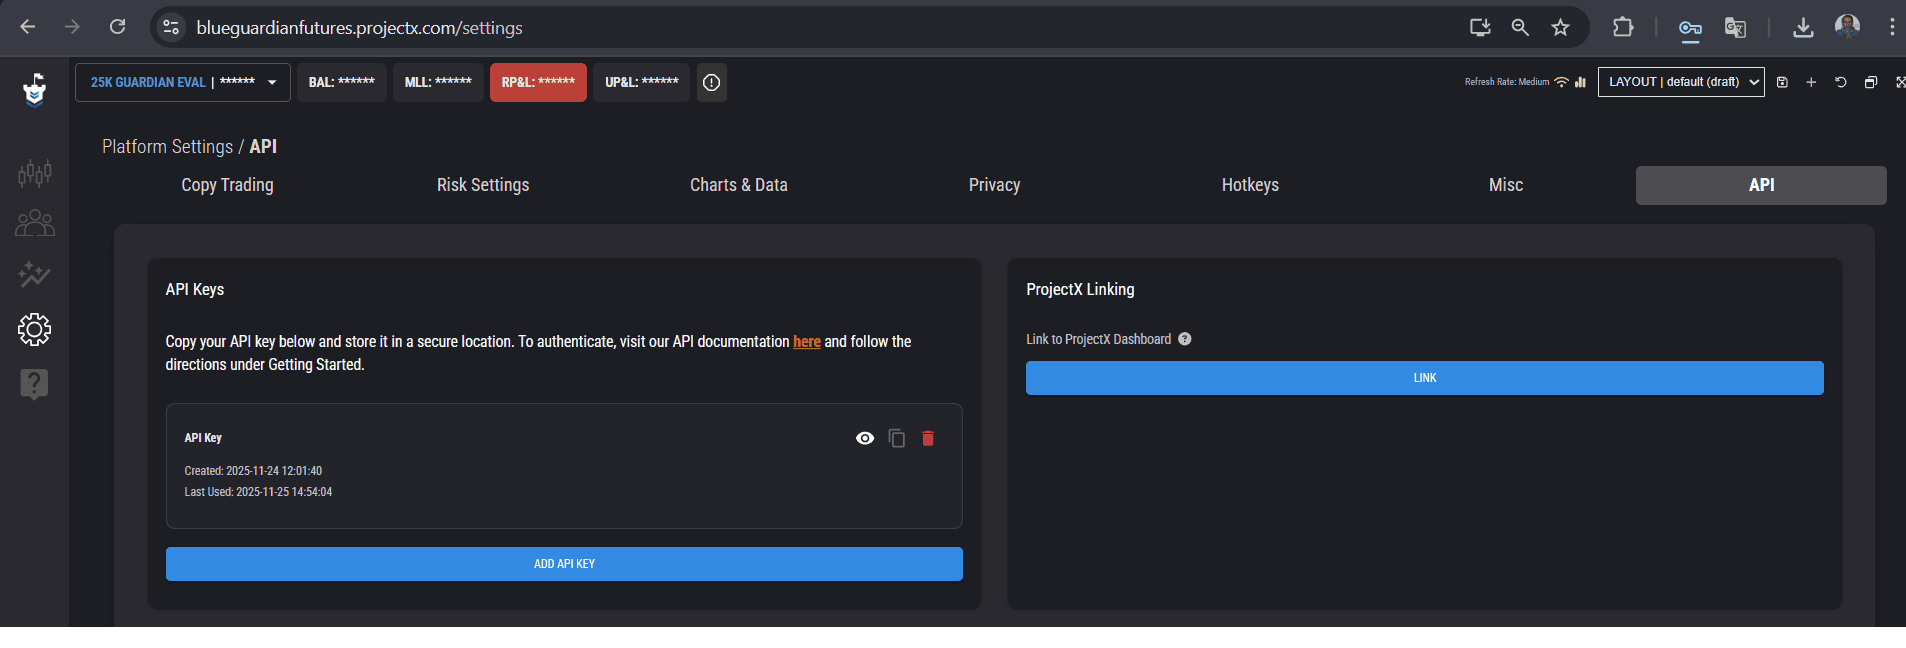
Step 2. Create an API Key in Your ProjectX Platform
After API Access is active, create an API key inside your ProjectX-connected trading platform. Depending on the firm or environment, this may appear under Settings, API, ProjectX Linking, or another API key section.
- Open the trading platform linked to ProjectX.
- Go to Settings → API or the equivalent API key section.
- Click Add API Key or Create API Key.
- Copy the generated API key.
- Store the key securely because you will paste it into AlgoWay.
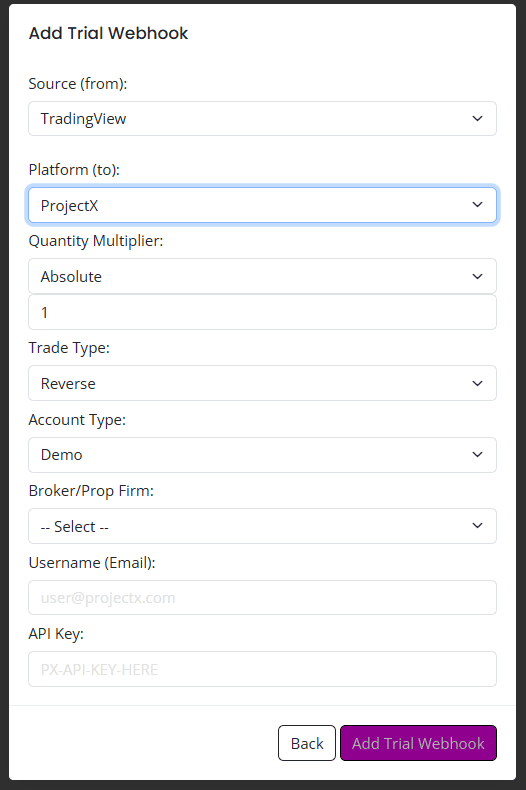
Step 3. Add a ProjectX Webhook in AlgoWay
Now create the ProjectX route inside AlgoWay.
- Log in to your AlgoWay account.
- Open Dashboard → Add Trial Webhook or Add Main Webhook.
- Select TradingView as the source.
- Select ProjectX as the platform.
- Fill in the ProjectX-specific fields.
- Click Add Trial Webhook or save the main webhook.
Main fields:
| AlgoWay field | Recommended value | Purpose |
|---|---|---|
| Source | TradingView | The alert source. |
| Platform | ProjectX | The execution destination. |
| Quantity Multiplier | Absolute or your selected route logic | Controls how incoming quantity is interpreted. |
| Trade Type | Reverse / Hedge / One-way | Controls how AlgoWay handles direction and open exposure. |
| Account Type | Demo or Live | Must match the ProjectX environment you want to trade. |
| Broker / Prop Firm | Your seller / evaluation / firm from the list | Routes to the correct ProjectX-connected environment. |
| Username / Email | Your ProjectX account email | Identifies the account for API authentication. |
| API Key | ProjectX API key | Used by AlgoWay to authenticate ProjectX API requests. |
Step 4. Send a Test Webhook from AlgoWay
Before connecting TradingView, test the ProjectX route from AlgoWay.
- Open Webhook Logs in AlgoWay.
- Click Test Webhook.
- Select your projectx webhook.
- Enter a valid futures symbol.
- Enter a small quantity.
- Select the action.
- Click Send.
- Check AlgoWay logs and the ProjectX-connected account.

If the test webhook fails, do not create the TradingView alert yet. Fix ProjectX API access, account type, broker/firm selection, API key, symbol or quantity first.
Step 5. Copy the AlgoWay Webhook URL
After the ProjectX webhook is created and tested, copy the webhook URL from AlgoWay.
- Open Dashboard → Your Webhooks.
- Find the row where Platform is projectx.
- Click the webhook UUID or copy button.
- Use the copied URL in TradingView.
Webhook URL format:
https://algoway.co/your-webhook-uuid
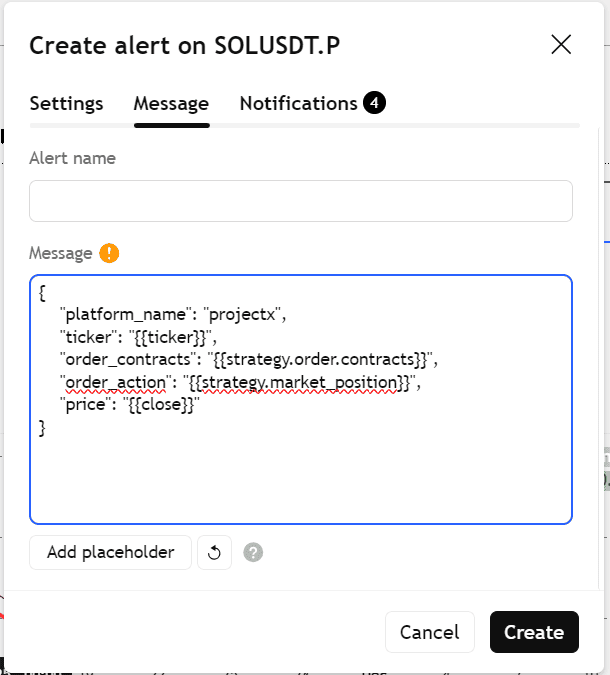
Step 6. Use Correct JSON for the TradingView Alert
TradingView must send valid JSON to AlgoWay. For a TradingView strategy alert, use this structure:
{
  "platform_name": "projectx",
  "ticker": "{{ticker}}",
  "order_contracts": "{{strategy.order.contracts}}",
  "order_action": "{{strategy.market_position}}",
  "price": "{{close}}"
}
TradingView replaces placeholders when the alert fires:
{{ticker}}— TradingView chart ticker;{{strategy.order.contracts}}— order size from the TradingView strategy;{{strategy.market_position}}— strategy state such as long, short or flat;{{close}}— close price at alert time.
Fixed Test JSON
For a controlled test, use a fixed symbol and small valid quantity:
{
  "platform_name": "projectx",
  "ticker": "MNQ",
  "order_contracts": 1,
  "order_action": "buy"
}
Use the exact symbol format accepted by your ProjectX-connected account. Futures symbols and continuous TradingView tickers can differ from the execution symbol expected by the API route.
Step 7. Create the TradingView Alert
Now create or edit the TradingView alert.
- Open the TradingView chart and choose the symbol, for example SOLUSDT.P, ES, NQ, MES or MNQ, depending on your route.
- Create an alert from your strategy, indicator or chart condition.
- On the Message tab, paste the JSON from Step 6.
- Do not change TradingView placeholders unless your route uses fixed values.
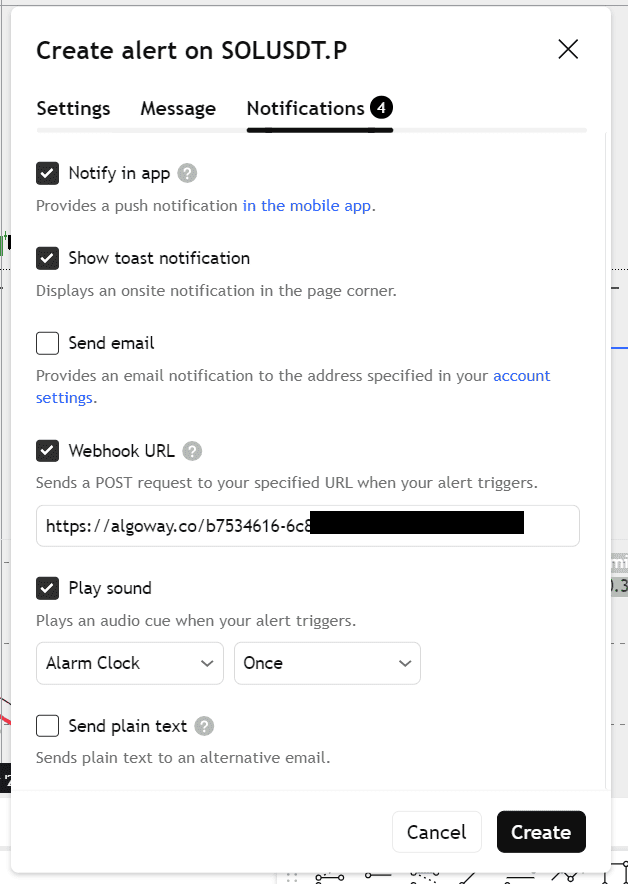
- Open Notifications.
- Enable Webhook URL.
- Paste the AlgoWay webhook URL copied in Step 5.
- Click Create.
ProjectX Symbols, Quantity and Account Rules
ProjectX automation is usually futures-focused, so symbol and quantity handling matter. Do not assume that the TradingView ticker is always the final executable symbol.
Before live automation, check:
- TradingView chart ticker;
- ProjectX accepted symbol format;
- contract month or continuous symbol behavior;
- minimum and maximum quantity;
- account type: demo or live;
- prop-firm rules;
- daily loss limit and drawdown rules;
- market hours;
- whether the instrument is enabled for the account.
Common futures examples include ES, NQ, MES and MNQ, but the exact accepted symbol depends on the connected ProjectX environment and route configuration.
Strategy Alerts vs Indicator Alerts
The JSON above is written for TradingView strategy alerts because it uses {{strategy.order.contracts}} and {{strategy.market_position}}.
If you use an indicator alert, those strategy placeholders may not exist. In that case, use fixed values or indicator-specific values that produce valid JSON.
Example indicator-style message:
{
  "platform_name": "projectx",
  "ticker": "{{ticker}}",
  "order_contracts": 1,
  "order_action": "buy",
  "price": "{{close}}"
}
General guide: How to create a TradingView webhook alert.
Trade Type: Reverse, Hedge and One-Way
The Trade Type setting controls how AlgoWay handles new signals when exposure already exists.
- Reverse: used when the latest signal should close or replace the current direction.
- Hedge: used when the route/account supports separate long and short exposure.
- One-way: used when the account or strategy should maintain one net direction.
For prop-firm futures accounts, confirm which behavior is allowed before live automation. Full guide: How AlgoWay handles opposite trading signals.
Common ProjectX Webhook Problems
ProjectX API Access Is Not Active
If the API subscription or API access is inactive, ProjectX can reject the request even when AlgoWay receives the TradingView alert.
API Key Was Created in the Wrong Environment
Make sure the API key belongs to the correct ProjectX-connected account, prop firm or evaluation environment.
Wrong Broker / Prop Firm Selected in AlgoWay
The Broker/Prop Firm field must match the ProjectX environment you want to trade.
Demo vs Live Mismatch
If AlgoWay is configured for demo but the API key or intended account is live, or the reverse, execution can fail or route to the wrong environment.
Invalid TradingView JSON
The alert message must be valid JSON. Missing quotes, broken commas or plain text messages can stop the route before ProjectX receives anything. See: How to fix AlgoWay webhook Error 415.
Wrong Symbol
TradingView symbols and ProjectX executable symbols may differ. Check the exact symbol accepted by the ProjectX route.
Invalid Quantity
Futures quantities are usually whole contracts. Test with a small valid quantity such as 1 contract where allowed by the account.
Prop-Firm Risk Rule Rejection
Even if the webhook is valid, a prop-firm account can reject or restrict trades because of risk limits, drawdown, market hours or account status.
TradingView Webhook URL Is Missing
JSON in the alert message is not enough. Enable Webhook URL in the TradingView Notifications tab and paste the AlgoWay URL.
Why Use AlgoWay Instead of Building a ProjectX TradingView Bot?
You can build your own TradingView-to-ProjectX bot, but you would need a public webhook server, TradingView payload parser, ProjectX API integration, account routing, error handling, logs, order validation and ongoing maintenance.
AlgoWay gives you a ready route:
- TradingView webhook receiver;
- ProjectX platform route;
- dashboard-based setup;
- API key configuration;
- test webhook tool;
- webhook logs;
- JSON examples;
- multi-platform automation environment.
This makes AlgoWay a no-code TradingView to ProjectX webhook connector for futures and prop-trading automation.
Related AlgoWay Guides
- How to create a TradingView webhook alert
- How to automate TradingView alerts to any broker with AlgoWay
- AlgoWay JSON schema guide
- How to fix AlgoWay webhook Error 415
- How to connect TradingView to Tradovate with AlgoWay
- How to copy TradingView alerts to multiple accounts
- TradingView backtesting and AlgoWay Trade Metrics
Final Summary
To connect TradingView to ProjectX with AlgoWay, enable ProjectX API Access, create the API key, create a ProjectX webhook in AlgoWay, test the route, copy the webhook URL, and create a TradingView alert with valid JSON.
ProjectX automation is powerful because it can connect TradingView strategies to futures and prop-firm execution workflows. It also requires careful setup: account type, firm selection, symbol, quantity, risk rules and API access must be correct before live automation.